Introduction
In cases where the failure of the database is not acceptable, there are ways to protect the data from database failures, especially for Single-point of failure in a scenario is where there is only one database server running.
MySQL has a lot of options on having a failover and load balancing setup from MySQL cluster, MySQL master-slave setup with MySQL router or even using a lower level load balance with Linux Virtual Server (which is a Load balancer and Fail-Over router using VRRP protocol) and MySQL master-master setup.
Choosing a Setup
MySQL Cluster is intended for large MySQL installations (ie. a server farm with 10-20 MySQL servers) which is too redundant for our installation and MySQL Master-Slave setup can only have one write (usually Master only) and one read (Slaves only).
Our choice is to use Master-Master MySQL and Linux Virtual Server (LVS/KeepaliveD) design is to allow writes to any Master (eg. 2 Master MySQL server).
The Web application can write to any one of the Master MySQL server but we needed to know and redirect connections to either one Master MySQL server when it is down or having high load.
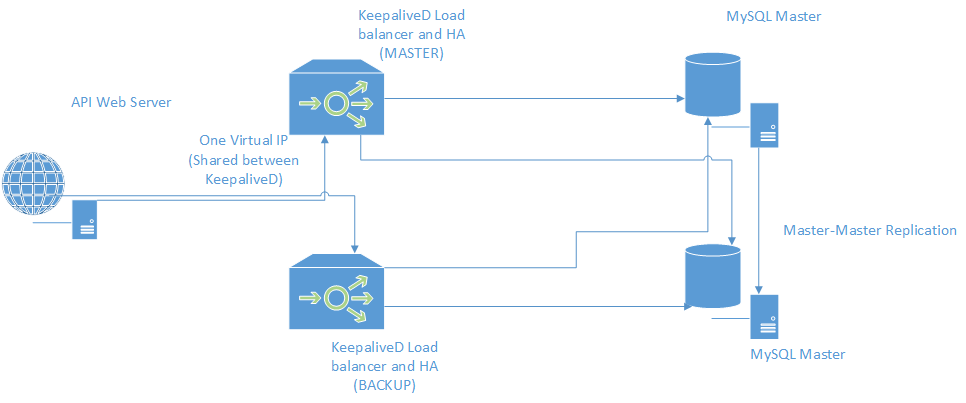
This is where LVS (KeepaliveD) comes in. KeepaliveD is a LVS ‘router’ software which keeps track of the health of the real servers (this case the Master MySQL servers) and redirects the MySQL client connection from the Web application to either one of the MySQL server.
If in event where any of the MySQL server fails when KeepaliveD runs the health check, it will be removed from the KeepaliveD internal routing and redirect to the other MySQL Master server.
KeepaliveD keeps a floating IP (also called a Virtual IP) which the Web application connects to and KeepaliveD redirects the connection to either MySQL Server.
Assuming we have two KeepaliveD router where one is MASTER and one is BACKUP sharing this Virtual IP where if one KeepaliveD router fails (eg. MASTER), the other KeepaliveD instance (eg. BACKUP) will take over the Virtual IP where the Web application is connecting to.
NOTE: In this post there are two types of Master, MySQL Master and LVS MASTER.
Diagram
Configuration Steps
MySQL Server Setup
Let’s assume the MySQL server IP is as follows:
Current running MySQL Server: 192.168.1.10
New MySQL Server: 192.168.1.11
Modifications to the current server:
- Stop all database activity by shutting down the Web application
- Dump the MySQL file from the running database,
$ mysqldump –u<youruser> -p mydatabase > database_dump.sql
- In the CURRENT running MySQL Server, backup a copy of mysql.cnf
$ sudo cp /etc/mysql/my.cnf /etc/mysql/my.cnf.orig
-
In the CURRENT running MySQL server, change the configuration /etc/mysql/my.cnf, add some options under [mysqld]
bind-address  = 0.0.0.0
log-bin = /var/log/mysql/mysql-bin.log
binlog-db-db=mydatabase # this is the database we will replicate
binlog-ignore-db=mysql
binlog-ignore-db=test
server-id = 1
- Restart the MySQL Server
-
Go to mysql console, type in ‘SHOW MASTER STATUS;’
IMPORTANT! Take note of File and Positon.
Example output:
mysql> show master status;
+------------------+----------+--------------+------------------+
| File             | Position | Binlog_Do_DB | Binlog_Ignore_DB |
+------------------+----------+--------------+------------------+
| mysql-bin.000010 |     1193 | mydatabase   |   mysql,test     |
+------------------+----------+--------------+------------------+
-
Then in the MySQL console, add a new grant for replication.
mysql> grant replication slave on *.* to 'replication'@'%' identified by ‘your_replication_password';
- In the NEW MySQL server, import the MySQL dump we got from the running MySQL Server
`$ mysql –u -p mydatabase < database_dump.sql
- In the NEW MySQL Server, backup a copy of my.cnf
$ sudo cp /etc/mysql/my.cnf /etc/mysql/my.cnf.orig
-
Edit /etc/mysql/mysql.cnf in the new MySQL Server with the following under [mysqld] and save the file.
bind-address  = 0.0.0.0
log-bin = /var/log/mysql/mysql-bin.log
binlog-db-db=mydatabase # this is the database we will replicate
binlog-ignore-db=mysql
binlog-ignore-db=test
server-id = 2 # id is different than the CURRENT MySQL server
-
Restart the MySQL on the New server.
-
Go to the new MySQL server’s (192.168.1.11) console, we will sync this new MySQL server with the current one (IMPORTANT! YOU NEED TO SET THE MASTER_LOG_FILE and MASTER_LOG_POS ACCORDING TO THE CURRENT RUNNING SERVER’S File and Position VALUES OR IT WILL NOT BE IN SYNC):
mysql> SLAVE STOP;
mysql> CHANGE MASTER TO MASTER_HOST='192.168.1.10', MASTER_USER='replication', MASTER_PASSWORD='your_replication_password', MASTER_LOG_FILE=’<the File value from running server>', MASTER_LOG_POS=<the Position value from the running server>;
mysql> SLAVE START;
-
Check the Status on the New MySQL server:
mysql> SHOW SLAVE STATUS\G;
-
Make sure these two values set to ‘YES’ with waiting master to send event and NO ERRORS:
Slave_IO_State: Waiting for master to send event
Slave_IO_Running: Yes
Slave_SQL_Running: Yes
- On the NEW MySQL server, run the following command:
mysql> grant replication slave on *.* to 'replication'@'%' identified by ‘your_replication_password';
- Then on the NEW MySQL Server’s Console, type in:
mysql> SHOW MASTER STATUS;
-
Take note of the File and Position of the above command in the NEW MySQL Server.
-
On the CURRENT Running MySQL Server (192.168.1.10), we will Sync up with the NEW MySQL Server one (IMPORTANT! YOU NEED TO SET THE MASTER_LOG_FILE and MASTER_LOG_POS ACCORDING TO THE NEW SERVER’S __File__ and __Position__ VALUES OR IT WILL NOT BE IN SYNC)
mysql> SLAVE STOP;
mysql> CHANGE MASTER TO MASTER_HOST='192.168.1.11', MASTER_USER='replication', MASTER_PASSWORD='your_replication_password', MASTER_LOG_FILE=’<the File value from NEW server>', MASTER_LOG_POS=<the Position value from the NEW server>;
- Check the Status of the CURRENT Running Server
mysql> SHOW SLAVE STATUS\G;
-
Make sure these two values set to ‘YES’ and waiting for master to send event and NO Errors:
Slave_IO_State: Waiting for master to send event
Slave_IO_Running: Yes
Slave_SQL_Running: Yes
-
GRANT privileges for normal database access for the Web App on the NEW server:
Example:
mysql> GRANT ALL PRIVILEGES ON mydatabase.* to ‘<the db user>’@’<the web app server IP>’ IDENTIFIED BY ‘<the password for the db user>’;
mysql> FLUSH ALL PRIVILEGES;
LVS (KeepaliveD)
We will need two servers (each can be low spec server with 2 Cores and at least 2GB RAM) which will be used for network high-availability and load balancing.
Assuming the IP address are as follows:
MASTER LVS: 192.168.1.20
BACKUP LVS: 192.168.1.21
CURRENT MYSQL SERVER: 192.168.1.10
NEW MYSQL SERVER: 192.168.1.11
Virtual (Floating IP) – **No need to be configured on any server’s interfaces, will be managed by keepalived**: 192.168.1.30
Change the IP in the configuration according to your infrastructure setup!
In both MASTER and BACKUP LVS server, download and install keepalived and ipvsadm
$ sudo apt-get install keepalived ipvsadm
Add this configuration to MASTER LVS (192.168.1.20) in /etc/keepalived/keepalived.conf:
global_defs {
    router_id LVS_MYPROJECT
}
vrrp_instance VI_1 {
    state MASTER
    # monitored interface
    interface eth0
    # virtual router's ID
    virtual_router_id 51
    # set priority (change this value on each server)
    # (large number means priority is high)
    priority 101
    nopreempt
    # VRRP sending interval
    advert_int 1
    # authentication info between Keepalived servers
    authentication {
        auth_type PASS
        auth_pass mypassword
    }

    virtual_ipaddress {
        # virtual IP address
        192.168.1.30 dev eth0
    }
}
virtual_server 192.168.1.30 3306 {
    # monitored interval
    delay_loop 3
    # distribution method
    lvs_sched rr
    # routing method
    lvs_method DR
    protocol TCP

    # backend server#1
    real_server 192.168.1.10 3306 {
        weight 1
        TCP_CHECK {
        connect_timeout 10
        nb_get_retry 3
        delay_before_retry 3
        connect_port 3306
        }
    }

    # backend server#2
    real_server 192.168.1.11 3306 {
        weight 1
        TCP_CHECK {
        connect_timeout 10
        nb_get_retry 3
        delay_before_retry 3
        connect_port 3306
        }
    }
}
Add this configuration to BACKUP LVS (192.168.1.21) in /etc/keepalived/keepalived.conf:
global_defs {
    router_id LVS_MYPROJECT
}
vrrp_instance VI_1 {
    state BACKUP
    # monitored interface
    interface eth0
    # virtual router's ID
    virtual_router_id 51
    # set priority (change this value on each server)
    # (large number means priority is high)
    priority 100
    nopreempt
    # VRRP sending interval
    advert_int 1
    # authentication info between Keepalived servers
    authentication {
        auth_type PASS
        auth_pass mypassword
    }

    virtual_ipaddress {
        # virtual IP address
        192.168.1.30 dev eth0
    }
}
virtual_server 192.168.1.30 3306 {
    # monitored interval
    delay_loop 3
    # distribution method
    lvs_sched rr
    # routing method
    lvs_method DR
    protocol TCP

    # backend server#1
    real_server 192.168.1.10 3306 {
        weight 1
        TCP_CHECK {
        connect_timeout 10
        nb_get_retry 3
        delay_before_retry 3
        connect_port 3306
        }
    }
    # backend server#2
    real_server 192.168.1.11 3306 {
        weight 1
        TCP_CHECK {
        connect_timeout 10
        nb_get_retry 3
        delay_before_retry 3
        connect_port 3306
        }
    }
}
Lastly, start the KeepaliveD services on both MASTER LVS and BACKUP LVS:
$ sudo service start keepalived
Final setup
In this final setup, we will configure the Web app to use KeepaliveD’s Virtual IP (192.168.1.30) and create some firewall rules on both the MySQL DATABASE SERVER, NOT LVS SERVER.
$ sudo iptables -t nat -A PREROUTING -d 192.168.1.30 -j REDIRECT-
edit /etc/rc.local on the MySQL Database servers to make the firewall rule persistent
#!/bin/sh -e
#
# rc.local
#
# This script is executed at the end of each multiuser runlevel.
# Make sure that the script will "exit 0" on success or any other
# value on error.
#
# In order to enable or disable this script just change the execution
# bits.
#
# By default this script does nothing.
/sbin/iptables -t nat -A PREROUTING -d 192.168.1.30 -j REDIRECT
exit 0
$ chmod 755 /etc/rc.local- Edit the .env file to use the Virtual IP (Example in our setup: 192.168.1.30)
- Start the Web Application
Notes
Make sure that either MySQL servers are shut down safely (eg. shutdown –h now) and do not perform a HARD shutdown/reset as it will make the database out of sync with each other.
We can now shutdown either one MySQL database or one of the LVS and the other will keep running.
